Buying Simulacrum and running it is one of the few strategies where the average profit and the profit you will actually see are completely different numbers. This page works through both, with every price checked against the live market rather than an old spreadsheet.
Prices below are Forbidden Rites at the time of writing: 1 Divine Orb = 7.99 Chaos Orb = 521 Exalted Orb, and 1 Mirror of Kalandra = 3,995 Divine Orb.
What one run pays you no matter what
Four things show up reliably. This is the part you can plan around.
| Source | Per run |
|---|---|
| Raw currency | 2.00 div |
| Liquid Emotions | 0.50 div |
| Raven’s Reflection — one per completed run | 1.63 div |
| Assorted uniques | 1.00 div |
| Total | 5.12 div |
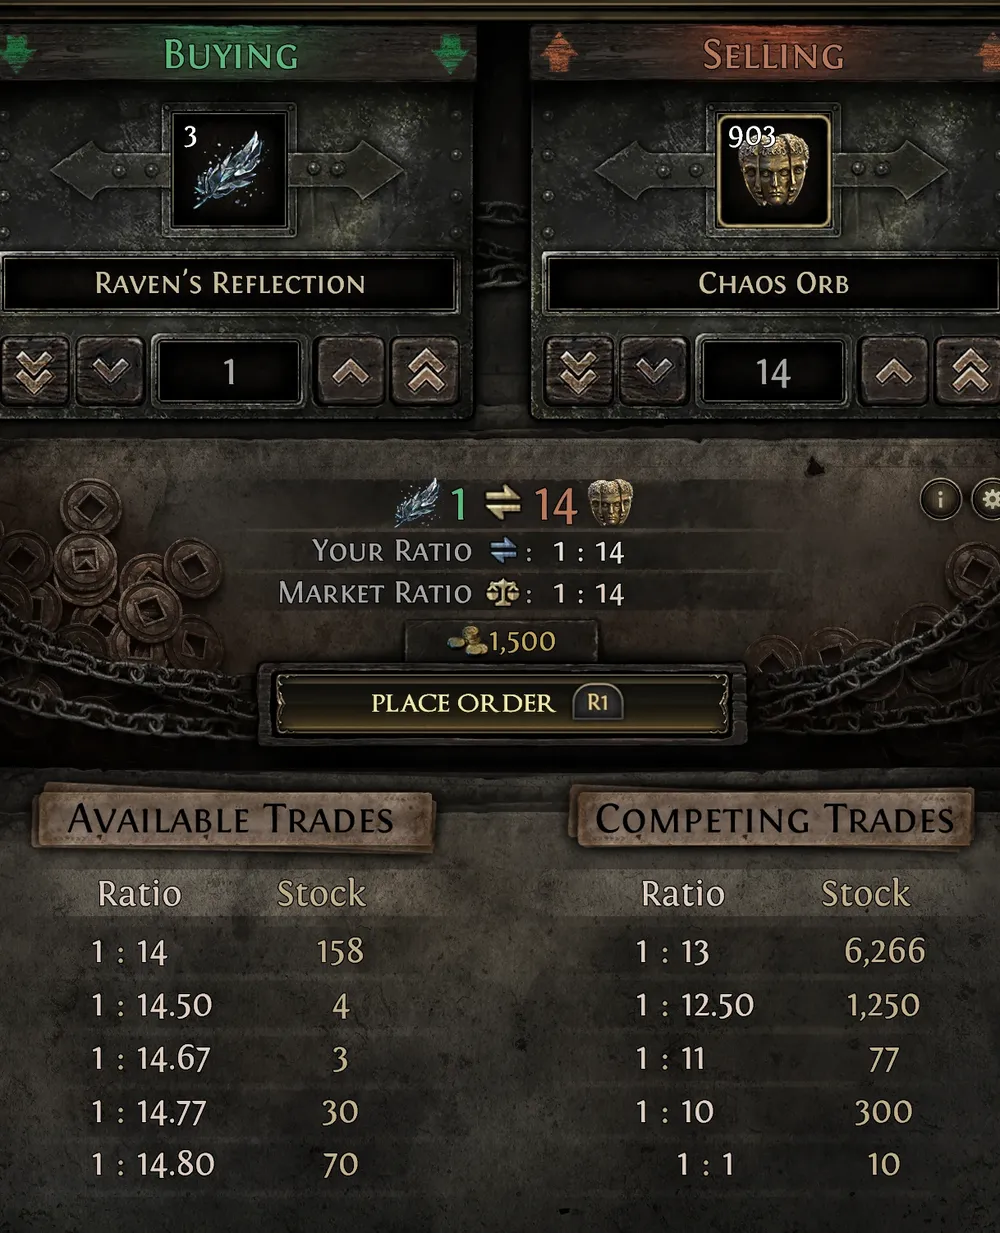
The Raven’s Reflection line is the one most guides get wrong. It is not a rare drop — completing a Simulacrum gives you one every time, and it sells instantly at 13 Chaos into an order book thousands deep. Guides that value it under half a Divine are quoting a dead league.
It is sometimes two
Wave 7 drops one or two Reflections, not always one. The table above counts one, which makes every number on this page a floor rather than a forecast — if your runs average more than one, everything below improves with it:
| Reflections per run | Steady income | Break-even price |
|---|---|---|
| 1.0 | 5.12 div | 40 Chaos |
| 1.25 | 5.53 div | 43 Chaos |
| 1.5 | 5.94 div | 46 Chaos |
| 2.0 | 6.75 div | 53 Chaos |
No Delirium Atlas notable mentions Reflection quantity — the whole Atlas stat pool does not contain the word. So the lever, if there is one, is on the waystone you opened the map with.
The candidate is Waystone Drop Chance, and it is the candidate because the same stat is already the confirmed lever on two other boss-gated drops:
- Citadel fragments. Maxroll’s citadel guide states plainly that fragment, Origin Core and Cradle drop rates are affected by Waystone Drop Chance modifiers, and recommends high-drop-chance waystones specifically to get multiple fragments from one boss. Community testing puts the first extra fragment somewhere around 300–400%, though those breakpoints are estimates for that drop, not this one.
- Lineage Supports. On the Jade Isles boss it is the strongest lever we have confirmed — see the two-run Rakiata’s Flow farm, where the whole strategy is built around rolling it high.
A Reflection has exactly that shape: a boss-gated item that drops one or two. It is not confirmed for Simulacrum, and nobody has published a test, but it costs nothing to stack a stat you are rolling on the waystone anyway. Note that only suffix modifiers grant it, so roll suffixes before you apply the Simulacrum.
Settling it is cheap. Over twenty runs, note the Waystone Drop Chance you opened with, the difficulty tier, the shards you took, and how many Reflections dropped. At roughly 1.6 div each the answer is worth real currency — the gap between averaging 1.0 and 1.5 is 13 Chaos of headroom on every Simulacrum you buy.
Everything else on the reward list — Voices, the chase uniques — is a lottery on top of this floor, not the floor itself.
The break-even price
That 5.12 div of reliable income, minus a small map cost, is what your Simulacrum has to cost less than.
| You pay | Profit per run, ignoring any chase drop |
|---|---|
| 25 Chaos Orb | +1.84 div (56%) |
| 27 Chaos Orb | +1.59 div (45%) |
| 29 Chaos Orb | +1.34 div (35%) |
| 32 Chaos Orb | +0.96 div (23%) |
| 35 Chaos Orb | +0.59 div (13%) |
| 40 Chaos Orb | break-even |
| 45 Chaos Orb | −0.66 div (−11%) |
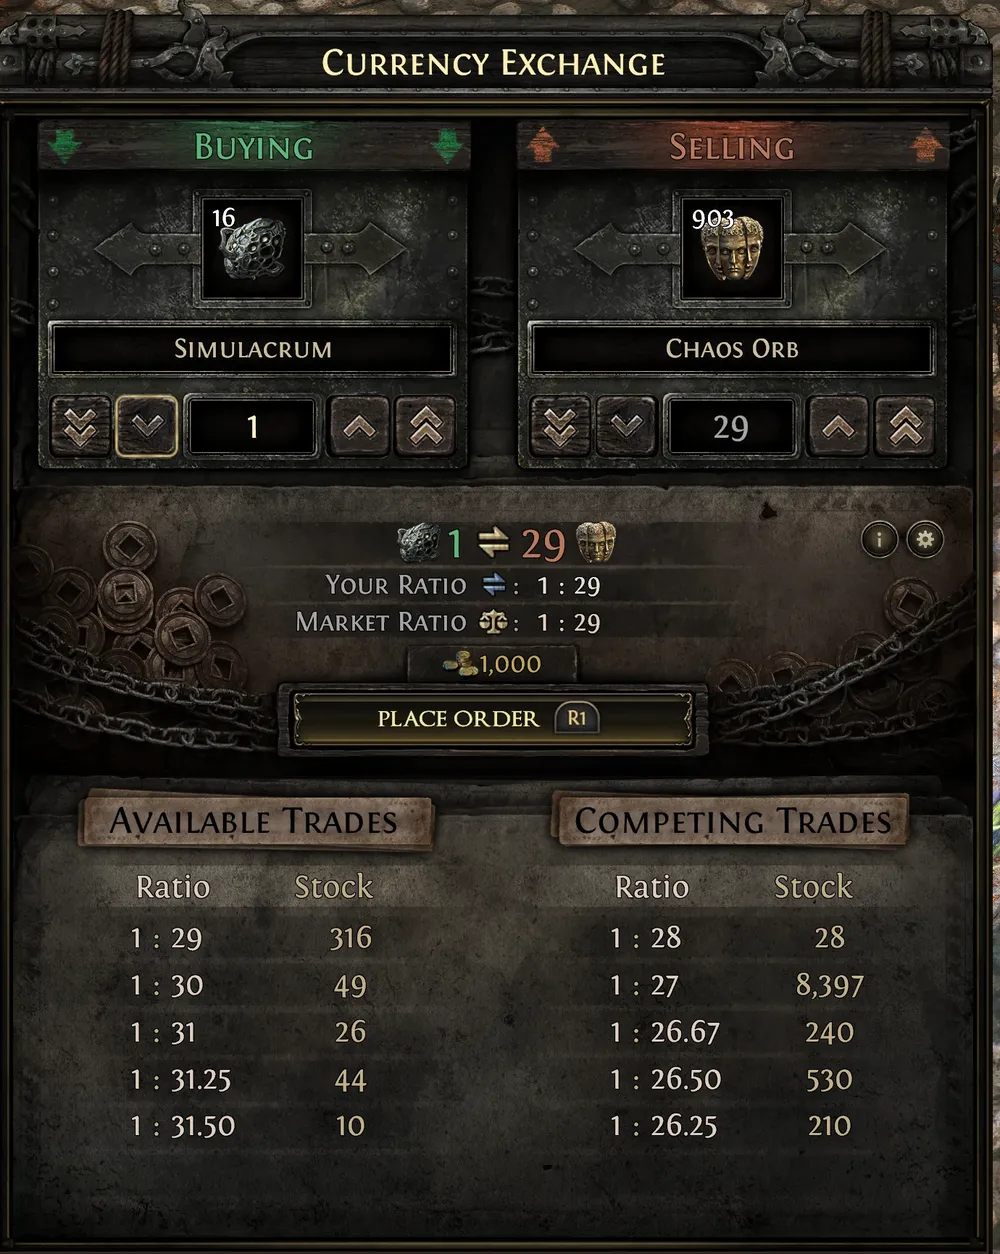
Forty Chaos is the line. Below it, the guaranteed drops pay for the run and anything rare is profit. Above it, you are buying lottery tickets and calling it farming. Check the price every time you restock — it moved from 27 to 29 Chaos in the span of a single conversation.
Pay in the cheapest currency
The Currency Exchange prices the same Simulacrum differently depending on what you hand over, and the gap is not small. At one point the three pairs read:
| You pay with | Rate | In Divine |
|---|---|---|
| Divine Orb | 3.4 : 1 | 3.40 div |
| Chaos Orb | 27 : 1 | 3.38 div |
| Exalted Orb | 1,500 : 1 | 2.88 div |
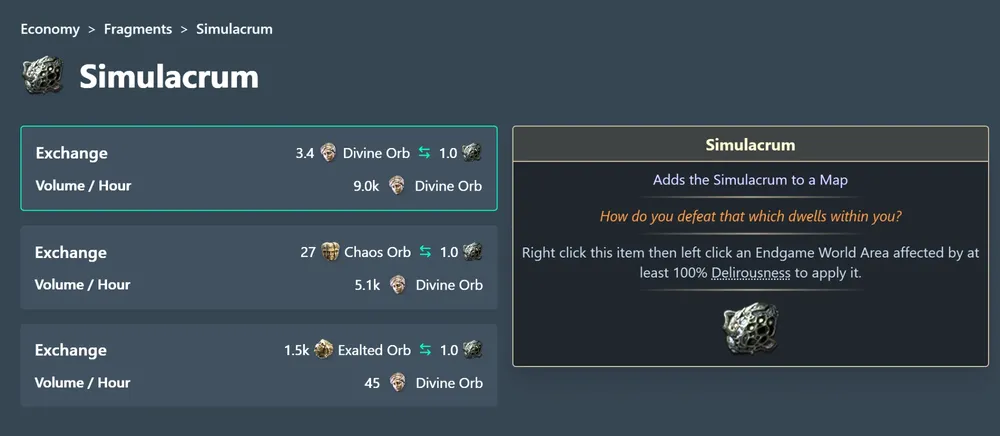
That is a 15% discount for changing nothing but the currency you click. On a 31-run stock it is the difference between 31 Simulacrum and 36.
The catch is depth. The Exalted pair carried about 45 Divine of volume per hour against 9,000 on the Divine pair, so buy in batches and watch whether the rate moves. Check all three pairs before every purchase — which one is cheapest changes.
Which monster drops what
The three jewels on this page do not come from the same place, and two of them are not boss drops at all. If you are farming for one in particular, this is what you are actually hunting.
| Drop | Comes from |
|---|---|
| Raven’s Reflection | Completing wave 7 — guaranteed, sometimes two |
| Voices | Anywhere in the Simulacrum; no monster owns it |
| Megalomaniac | Anywhere in the Simulacrum; no monster owns it |
| Split Personality | The Raven Trickster, and nothing else |
| Veilpiercer, Sadist’s Mercy | The Raven Trickster — the common half of his pool |
| The Auspex, Horror’s Flight | The Raven Trickster — sometimes Raven-Touched |
| The Raven’s Flock | The Raven Trickster — rare |
| Tangmazu’s Thurible, Trickster’s Shard | The Raven Trickster — Lineage Support gems, rarest tier |
| Raven-Touched Shard | The Raven Trickster — rarest tier |
Two named monsters appear in the waves themselves. Omniphobia, Fear Manifest shows up first, Kosis, The Revelation a wave or two later, and both can appear more than once in a run. They are a difficulty spike rather than a target: neither owns any of the jewels above. Voices and Megalomaniac are area drops, restricted to the Simulacrum but not to any monster in it, so every rare pack in every wave is a roll at them.
Everything with a boss name attached sits behind The Raven Trickster instead, and you reach him by finishing wave 7 rather than by hunting anything in particular. That is why this page treats the Reflection as the unit of income: one completed run is one guaranteed pull from his pool.
Voices: the socket count is the price
This is the drop everyone is farming for, and its value swings by a factor of fifty depending on one line of text.
| Sockets | Price | Listings on the market |
|---|---|---|
| 2 | 700 Divine Orb | 54 |
| 3 | 2 Mirror of Kalandra (7,990 div) | 14 |
| 4 | 9 Mirror of Kalandra (35,955 div) | 3 |
You can read the socket count before identifying it, so there is no gamble here. Most of what sits on the market is unidentified, and it is priced by socket count all the same.
Weighting those prices by how the market is stocked puts a random Voices at roughly 3,600 div. Treat that as optimistic: expensive rolls sit unsold and pile up on the board while 2-socket copies turn over fast, so the real drop mix is more 2-socket-heavy than the listings suggest. Plan on 1,500 to 2,500 div and be delighted when it is more.
Community reports put the drop at roughly one per 80 to 200 runs. At 150 runs per copy, ten runs gives you a 6.5% shot and a hundred runs gives you 49%.
Split Personality: the class decides everything
Sorting this jewel by name alone gives you 2 Chaos and a wrong conclusion. The mod line is the whole item, and the spread across classes is over two hundred times.
| Starting point | Cheapest instant buy | Listings |
|---|---|---|
| Shadow | 70 Divine Orb | 64 |
| Templar | 113 Chaos Orb (14.1 div) | 138 |
| Sorceress | 50 Chaos Orb (6.3 div) | 260 |
| Ranger | 3 Chaos Orb | 362 |
| Mercenary | 2 Chaos Orb | 431 |
| Warrior | 2 Chaos Orb | 426 |
Scarcity and price line up cleanly: the fewer copies on the market, the more it fetches. Read the mod before you vendor anything — a Shadow roll is worth more than twenty Simulacrum, and it looks identical to the 2-Chaos Warrior version in a stash tab.
Megalomaniac: check it every single time
This one is an area drop, not a boss drop — restricted to the Simulacrum but not to anything inside it, so any pack in any wave can produce it. Community testing puts it around 5% per completed run, so roughly one every twenty. There is nothing to hunt for it beyond killing more monsters per run.
It always drops Corrupted. The notables it rolled are permanent; no orb changes them. The only thing you do with it is look up what it rolled.
| Price | What it rolled |
|---|---|
| 21 Mirror of Kalandra | Anticipation + Lasting Toxins |
| 10 Mirror of Kalandra | Hidden Barb + Thirst for Power + Spellblade |
| 10 Mirror of Kalandra | Secrets of the Orb + Overflowing Power |
| 8 Mirror of Kalandra | General Electric + Harness the Elements + Infusion of Power |
| 7 Mirror of Kalandra | Spellblade + Battle Trance + Slow Burn |
| 1 Chaos Orb | the floor, and most of them |
That is a wider spread than Voices — from one Chaos to twenty-one Mirrors, a factor of about 170,000. The board is flooded: a search returns more listings than the site will count, and the overwhelming majority sit at one or two Chaos because their notables suit nobody.
Three notables beat two. Five of the seven most expensive genuine listings rolled three rather than two. That is worth an Atlas point: the notable Is this about me… or you? gives Megalomaniac Jewels a 10% chance to allocate three notables instead of two. The same node also makes Simulacrum Splinters drop in level 75+ maps, so a Delirium farmer wants it regardless.
Higher Simulacrum difficulty is reported to improve the odds of one dropping. One guide goes further and claims it only drops at the top difficulty at all; others contradict that, so treat the hard requirement as unconfirmed and the general direction as sound.
The practical rule is simple. Never vendor one. Read the two or three notables off it, put them into the trade search, and look at what the same combination is selling for. It takes twenty seconds and the downside of skipping it is throwing away a Mirror.
How many runs before luck stops deciding
With the Simulacrum at 29 Chaos and a build that finishes every run, here is what a batch of runs actually looks like. The median column is what a typical session gives you; the mean is dragged upward by the rare Voices.
| Runs | Chance you end down | Median profit | Mean profit |
|---|---|---|---|
| 1 | 39% | ±0 div | +16 div |
| 10 | 4.1% | +13 div | +168 div |
| 25 | 0.2% | +44 div | +429 div |
| 50 | ~0% | +156 div | +850 div |
| 100 | ~0% | +766 div | +1,714 div |
Ten runs is nearly safe but barely pays — a median of 13 Divine on 45 Divine spent. The gap between median and mean is the Voices you probably did not get. Real money starts around fifty runs.
The risk is your clear speed, not your luck
Everything above assumes you finish wave 7. If you only complete 70% of the runs you pay for, the picture changes completely:
| Runs | Finish every run | Finish 70% |
|---|---|---|
| 10 | 4.1% chance of a loss | 33.7% |
| 25 | 0.2% | 18.8% |
| 50 | ~0% | 8.6% |
| 100 | ~0% | 2.0% |
A build that abandons a third of its runs turns a safe strategy into a coin flip. Buy three to five first and count how many you finish. That number, not the drop table, decides whether this farm works for you.
Which waystone to open it with
A Simulacrum is applied to a map you already opened, so the waystone is decided before the encounter exists — and its modifiers carry in. Every waystone modifier pairs a reward with a danger, and the rewards come in three kinds that are not worth the same here:
| Reward on the modifier | Worth paying for? |
|---|---|
| increased Rarity of Items found in this Area | Yes — it applies to what drops |
| increased Quantity of Items found in this Area | Yes |
| increased Waystones found in Area (the waystone’s own Drop Chance) | Yes — the lever discussed above |
| increased Pack size, more Magic and Rare Monsters | Probably dead weight — spawn-side |
That last row is the one that changes how you roll. A modifier like Painful pays you in “25% more Magic and Rare Monsters”, and a Simulacrum brings its own waves — so you are accepting increased Monster Damage in exchange for monsters that may never spawn. Under the spawn-side reasoning above, half the pool is selling you something you cannot spend.
The cleanest modifiers have no monster rider at all:
| Modifier | Effect |
|---|---|
| Collector’s | (50–65)% increased Rarity of Items found in this Area |
| Plundering | (10–15)% increased Quantity and (18–24)% increased Rarity |
| Oppressive / of Miring | 13% increased Quantity, 8% increased Rarity, 5% increased Pack size |
For drop chance the best rates are 25% more Waystones found in Area, and all of them come with a rider. Pick the rider your build does not feel:
| Modifier | What you get | What you accept |
|---|---|---|
| of Exposure | 25% more Waystones | −3 to −4% maximum Player Resistances |
| Fleeting | 25% more Waystones | Monsters 10–15% increased Attack, Cast and Movement Speed |
| Splitting | 25% more Waystones | Monsters fire 2 additional Projectiles |
| Penetrating | 20% more Waystones, 16% more Rarity | Monster Damage Penetrates 6–8% Elemental Resistances |
| of Erosion | 20% more Waystones, 13% more Rarity | Periodic Elemental Weakness |
If you are resistance-overcapped, the bottom three cost you almost nothing and two of them hand you Rarity as well. Avoid the riders that scale with how crowded the screen is — extra projectiles, increased Area of Effect, increased Monster Damage. Wave 7 is already the densest room in the game, and those are the modifiers that turn a run you would have finished into one you walk away from.
Which shard to take between waves
Once you have unlocked the Atlas notable You can’t just wake up from this one., the Simulacrum offers a shard between waves and you pick one of three:
| Shard | What it adds |
|---|---|
| Pure Emotions | Extra monster packs |
| Apex Predators | An extra boss |
| Escalating Threats | An extra encounter modifier |
The part that decides how you should pick is easy to miss: each one applies to that wave and every wave after it. They stack as you go, so a shard taken at wave 1 runs for six more waves while the same shard at wave 6 barely gets used. The first pick is worth several times the last.
Given what actually pays, the order is:
- Apex Predators. Bosses are where the money is. The Reflection comes off wave 7, every chase drop is boss-gated, and an extra boss applies to this wave and all the rest — so it multiplies the part of the run that carries the value rather than the part that tops it up. Crucially, a Simulacrum does not lock you out on death the way a map does, so a fight you are not comfortable with costs you time, not the run.
- Pure Emotions when you genuinely cannot kill them. Extra packs scale currency, emotions and odds-and-ends. That is real income, but it is the smaller half of the run and it does nothing for the drops worth hundreds of Divine.
- Escalating Threats last. It buys difficulty with the loosest connection to reward of the three.
The argument against stacking bosses is the clock, not the risk. If three extra bosses turn an eight-minute run into a twenty-minute one, your Divine per hour can fall even as your Divine per run rises. That is the trade worth measuring on your own build — time a few runs at each setting rather than assuming either way.
If you are offered more than one pick, take them — that is the Atlas notable Are you sure you want to do that?, which gives a 20% chance that a wave’s shards allow multiple selections. It is also the answer to why the choice sometimes lets you keep two or three and usually only one.
Which Atlas master to run
Each master has twelve nodes in four rows of three, and you get four points to spend across them. It is not one point per row — you can stack three in a single row if that is where the value is, and the layouts below show exactly which nodes sit together. Only one master is active at a time and switching is free between maps, so this is a per-strategy choice rather than a commitment.
None of the three targets Delirium, and most of these nodes describe content a Simulacrum does not contain: strongboxes, Expedition, Rogue Exiles, Atlas traversal, corrupted waystones. Below is every node with its in-game wording, marked for whether it can plausibly fire inside the encounter — waves of rare and unique monsters, a boss at the end, on a map you opened with a waystone.
Doryani's Science
Row 1
-

Evolutionary Pressure
1% increased Rarity, 2% increased monster Effectiveness and 3% rare-monster modifier chance, each per Explicit Modifier on the Map
Works -
Stitch the Flesh
Your Maps have an additional Revival, up to 6
Marginal -

Archaic Corruption
Monsters released from Essences become Corrupted
Dead
Row 2
-

Disengaged Safeties
Map Areas are Irradiated
Works -

Improved Calibration
Waystones have 25% more effect of Prefix Modifiers or 25% more effect of Suffix Modifiers when opening Maps
Works -
Careful Procurement
Magic Monster Packs have 35% chance of an additional Modifier
Marginal
Row 3
-
Mechanical Guardians
Non-Unique Strongboxes guarded by a dormant Construct
Dead -
Hidden Patterns
10% chance on completing a Map to make nearby Maps accessible
Dead -

Volatile Connection
15% chance areas are Cleansed or Corrupted
Marginal
Row 4
-
Head of the Snake
Pinnacle Bosses: 25% chance of an additional Unique, a single Revive, 5% Citadel reveal
Marginal -
Dam the River
Azmeri Spirits only Possess after maximum empowerment
Dead -
Remnants of Greatness
Map Bosses have 20% chance to guard a Precursor Terraformer
Dead
Hilda's Hunting
Row 1
-

Breeding Season
15% increased Rare Monsters; Rare Monsters have 25% increased chance of Monster Modifiers
Marginal -

Mighty Prey
25% chance to upgrade Map Bosses to Powerful Map Bosses
Marginal -

Scarred Lands
Runic Monster Markers and Rare Expedition Monsters
Dead
Row 2
-

Soul Eaters
Map Bosses gain 2% Effectiveness per 100 Power of monsters slain in the area
Marginal -

Dangerous Game
Rogue Exiles flee to an adjacent Map
Dead -

Will of the Draíocht
Azmeri Spirits cannot Possess Rare Monsters
Dead
Row 3
-

Lethal Adaptation
40% increased Effectiveness of Unique Monsters with Modifiers
Dead -
Call of the Spirits
Possessed Unique Monsters Release Spirits on death
Marginal -

Ancient Inscriptions
8% increased Tablet modifier effect per type of Tablet affecting the area
Works
Row 4
-

Gutting and Skinning
Pinnacle Bosses 5% chance of an additional Unique; 1% chance Unique Monsters may be scavenged for a Unique item
Works -

Patient Battue
25% chance 1 Rare Monster is replaced by a random Map Boss; 5% chance 3 more are
Marginal -

Claimed Territories
Overlord's Influence and Domain have 45% chance to add twice as much content
Dead
Jado's Spycraft
Row 1
-

Unexpected Missions
Corrupted Waystones get an extra modifier and open a random Map
Dead -

In The Wrong Hands
Powerful Map Bosses drop an additional unique item
Marginal -

Trove Seekers
100% increased Rare Chests; Strongboxes 100% more likely Unique
Dead
Row 2
-

Mysterious Gifts
Cryptic Keys from Strongbox and Unique Monsters
Marginal -

Eastern Knowledge
Verisium Remnants rerolled for the rarest outcome
Dead -

Unforeseen Threats
5% chance to reveal a nearby Anomaly Map
Dead
Row 3
-

Partial Translations
Randomly gain 0–40% increased effect of Tablet modifiers
Works -

Long Days
20% more chance of Random Extra Content
Marginal -

Stolen Relics
Unique Strongboxes may drop a Twilight Reliquary Key
Dead
Row 4
-

Ancient Activations
Powerful Map Bosses 5% chance to add Ancient Modifiers nearby
Dead -

Keen Appraisal
50% increased Exceptional Items found
Works -

Untold Histories
35% increased chance to find Lineage Supports; Pinnacle Bosses take 35% less Damage
Dead
Before picking, it is worth splitting these nodes into three kinds, because they do not all have the same claim on working here.
- Map-modifier nodes almost certainly work. The modifiers on the map you opened carry into the Simulacrum, and the waystone ones are applied at the moment you open the map — before the encounter exists at all.
- Spawn-side nodes probably do not. A Simulacrum brings its own waves, and a 0.5.1 fix specifically stopped it pulling monsters in from other sources. Anything worded as adding, replacing or upgrading the monsters an area spawns is betting against that.
- On-kill and reward nodes are in between. They trigger on a monster dying rather than on how the area was populated, so they have a better claim — but nobody has tested them either.
Doryani is the pick, and all four points have somewhere to go. Evolutionary Pressure in row 1 pays out per Explicit Modifier on the map, and the whole of row 2 feeds it: Improved Calibration multiplies what you rolled on the waystone, Disengaged Safeties makes the area Irradiated — which is more modifiers on the map for Evolutionary Pressure to count — and Careful Procurement adds a modifier to magic packs. Every one of them is on the map-modifier side, the one kind we can point to evidence for, and because points are not locked to one per row you can take all three of row 2 and still have Evolutionary Pressure above it.
Hilda has the loudest nodes and the weakest claim. Patient Battue replacing rare monsters with bosses would be perfect for this farm if it fired, but it is spawn-side, and so is Breeding Season. Her one node worth taking here is Gutting and Skinning, which triggers when a unique monster dies — and a Simulacrum kills unique monsters by the hundred. The catch is where it sits: Gutting and Skinning is in the bottom row, so getting to it means spending points on the way down, and row 2 offers only inert nodes or Soul Eaters, which is worse than inert — it makes the boss tougher for nothing. Ancient Inscriptions in row 3 at least earns its point if you tabletted the map. Run her if you would rather bet on the on-kill node than on drop chance, and know that you are paying three points for it.
Jado is the popular answer, for a different farm. Guides naming a master for Delirium are almost always talking about farming Simulacrum Splinters in maps, where his tablet and corrupted-waystone nodes genuinely shine. Inside the encounter there are no tablets left to scale. One thing does line up for him, though: Untold Histories raises how often Lineage Supports drop, and two of The Raven Trickster’s rarest drops are Lineage Supports. The same node makes Pinnacle bosses take 35% less damage — and he is the Pinnacle boss you would be farming — so you pay for that chance in kill time.
None of the three has a node written for Delirium, so the gap between them is small either way. If you want to settle it, the cleanest test is Doryani versus Hilda over twenty runs each at the same difficulty and waystone — the same log that answers the Reflection question above.
What does not matter: map Deliriousness
The Simulacrum requires an area at 100% Deliriousness, and it is tempting to assume 200% doubles something. It does not. The item asks for at least 100% because that is a gate, not a multiplier — the Simulacrum tracks its own Deliriousness once you are inside, starting from the difficulty you picked and climbing 5% per wave.
| Difficulty | Starts at | By wave 7 |
|---|---|---|
| Normal | 5% | ~40% |
| Cruel | 25% | ~60% |
| Merciless | 45% | ~80% |
Push the difficulty tier, not the map fog. A 200% Deliriousness map is still worth building for its own Delirium encounters, where higher fog does shift Liquid Emotions toward rarer tiers — that is simply a different farm.
This mechanic is not documented officially. If you are about to commit a large stock to it, run five Simulacrum at 100% and five at 200% on the same difficulty and compare — the interface will not tell you either way.
Should you use your Raven’s Reflection instead of selling it?
Each Reflection opens one fight against The Raven Trickster, which drops one guaranteed unique from a pool of six plus a small chance at a Raven-Touched Shard. Older guides model this as hugely profitable, and their numbers no longer hold — the six-item pool has been farmed into the ground.
| Guaranteed pool | Cheapest instant buy |
|---|---|
| Split Personality (Warrior roll) | 2 Chaos Orb |
| Horror’s Flight | 1 Chaos Orb |
| The Raven’s Flock | 9 Exalted Orb |
| Veilpiercer | 3 Exalted Orb |
| Sadist’s Mercy | 2 Exalted Orb |
| The Auspex | 1 Exalted Orb |
Averaged out, the guaranteed drop is worth about 0.07 div — effectively nothing, unless the Split Personality rolls a good class. All of the value sits in the Raven-Touched Shard, and the Currency Exchange prices it properly: 1,471 Chaos to buy one, 1,101 Chaos to sell one instantly. That is 184 div and 138 div respectively. Community reports put it at roughly a 2.5% chance per fight.
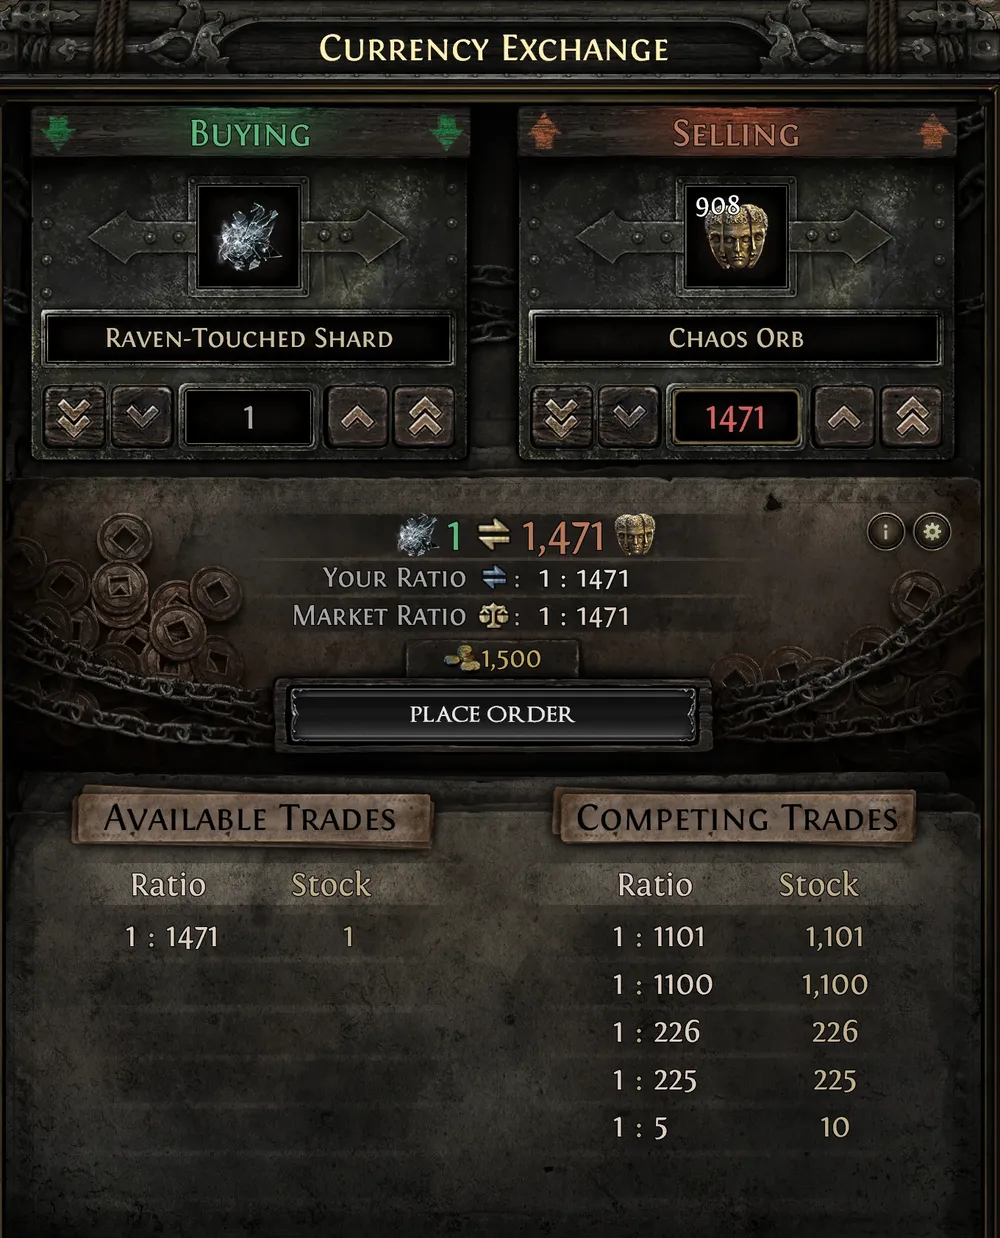
So a Reflection is worth about 3.5 div if you run it against 1.63 div if you sell it — twice as good on average, and still the wrong call for most people. At 2.5% you need about forty fights for an even chance at a single shard, and across thirty-one attempts there is a 46% chance you finish with nothing but vendor trash. Sell them unless your stock runs to the hundreds.
The short version
- Buy below 40 Chaos, never above.
- Check the Divine, Chaos and Exalted pairs every time — the gap has been as wide as 15%.
- Sell your Raven’s Reflection every run. It is guaranteed income, not a rare drop.
- Read the mod on Split Personality, the socket count on Voices and the notables on Megalomaniac before you price anything. Never vendor a Megalomaniac.
- Take shards early — they apply to every remaining wave. Apex Predators unless the bosses genuinely stop you; that is where the value is.
- Run Doryani, taking Evolutionary Pressure plus all three of row 2 — the map-modifier nodes are the only master effects with evidence they reach inside the encounter, and all four of your points fit on them.
- Roll the waystone for Rarity and Waystones found, not Pack size — extra monsters are spawn-side and a Simulacrum brings its own.
- Map Deliriousness above 100% does nothing for the Simulacrum; difficulty does.
- Plan for fifty runs, not ten.
Sources
This article is written by us from the sources below, together with in-game item data and hands-on testing. Credit for the original material belongs to each creator.
- Official trade site — Forbidden Rites listings
- poe2db: Simulacrum
- poe2db: Raven's Reflection
- poe2db: Voices
- poe2db: Megalomaniac
- poe2db: Split Personality
- Maxroll: Boss Loot Table Cheat Sheet